クロスプラットフォームモバイルアプリケーションの作成
コード例: tutorial-client-kmp
Ktor HTTPクライアントはマルチプラットフォームプロジェクトで使用できます。このチュートリアルでは、リクエストを送信し、レスポンスボディをプレーンなHTMLテキストとして受け取るシンプルなKotlin Multiplatform Mobileアプリケーションを作成します。
前提条件
まず、適切なオペレーティングシステムに必要なツールをインストールして、クロスプラットフォームモバイル開発のための環境をセットアップする必要があります。これを行う方法については、環境をセットアップするセクションを参照してください。
このチュートリアルの一部の手順(iOS固有のコード記述やiOSアプリケーションの実行など)を完了するには、macOSを搭載したMacが必要です。
新しいプロジェクトを作成する
新しいプロジェクトを作成するには、IntelliJ IDEAのKotlin Multiplatformプロジェクトウィザードを使用できます。これにより、クライアントとサービスを拡張できる基本的なマルチプラットフォームプロジェクトが作成されます。
- IntelliJ IDEAを起動します。
- IntelliJ IDEAで、File | New | Projectを選択します。
- 左側のパネルで、Kotlin Multiplatformを選択します。
- New Projectウィンドウで、以下のフィールドを指定します。
- 名前: KmpKtor
- グループ: com.example.ktor
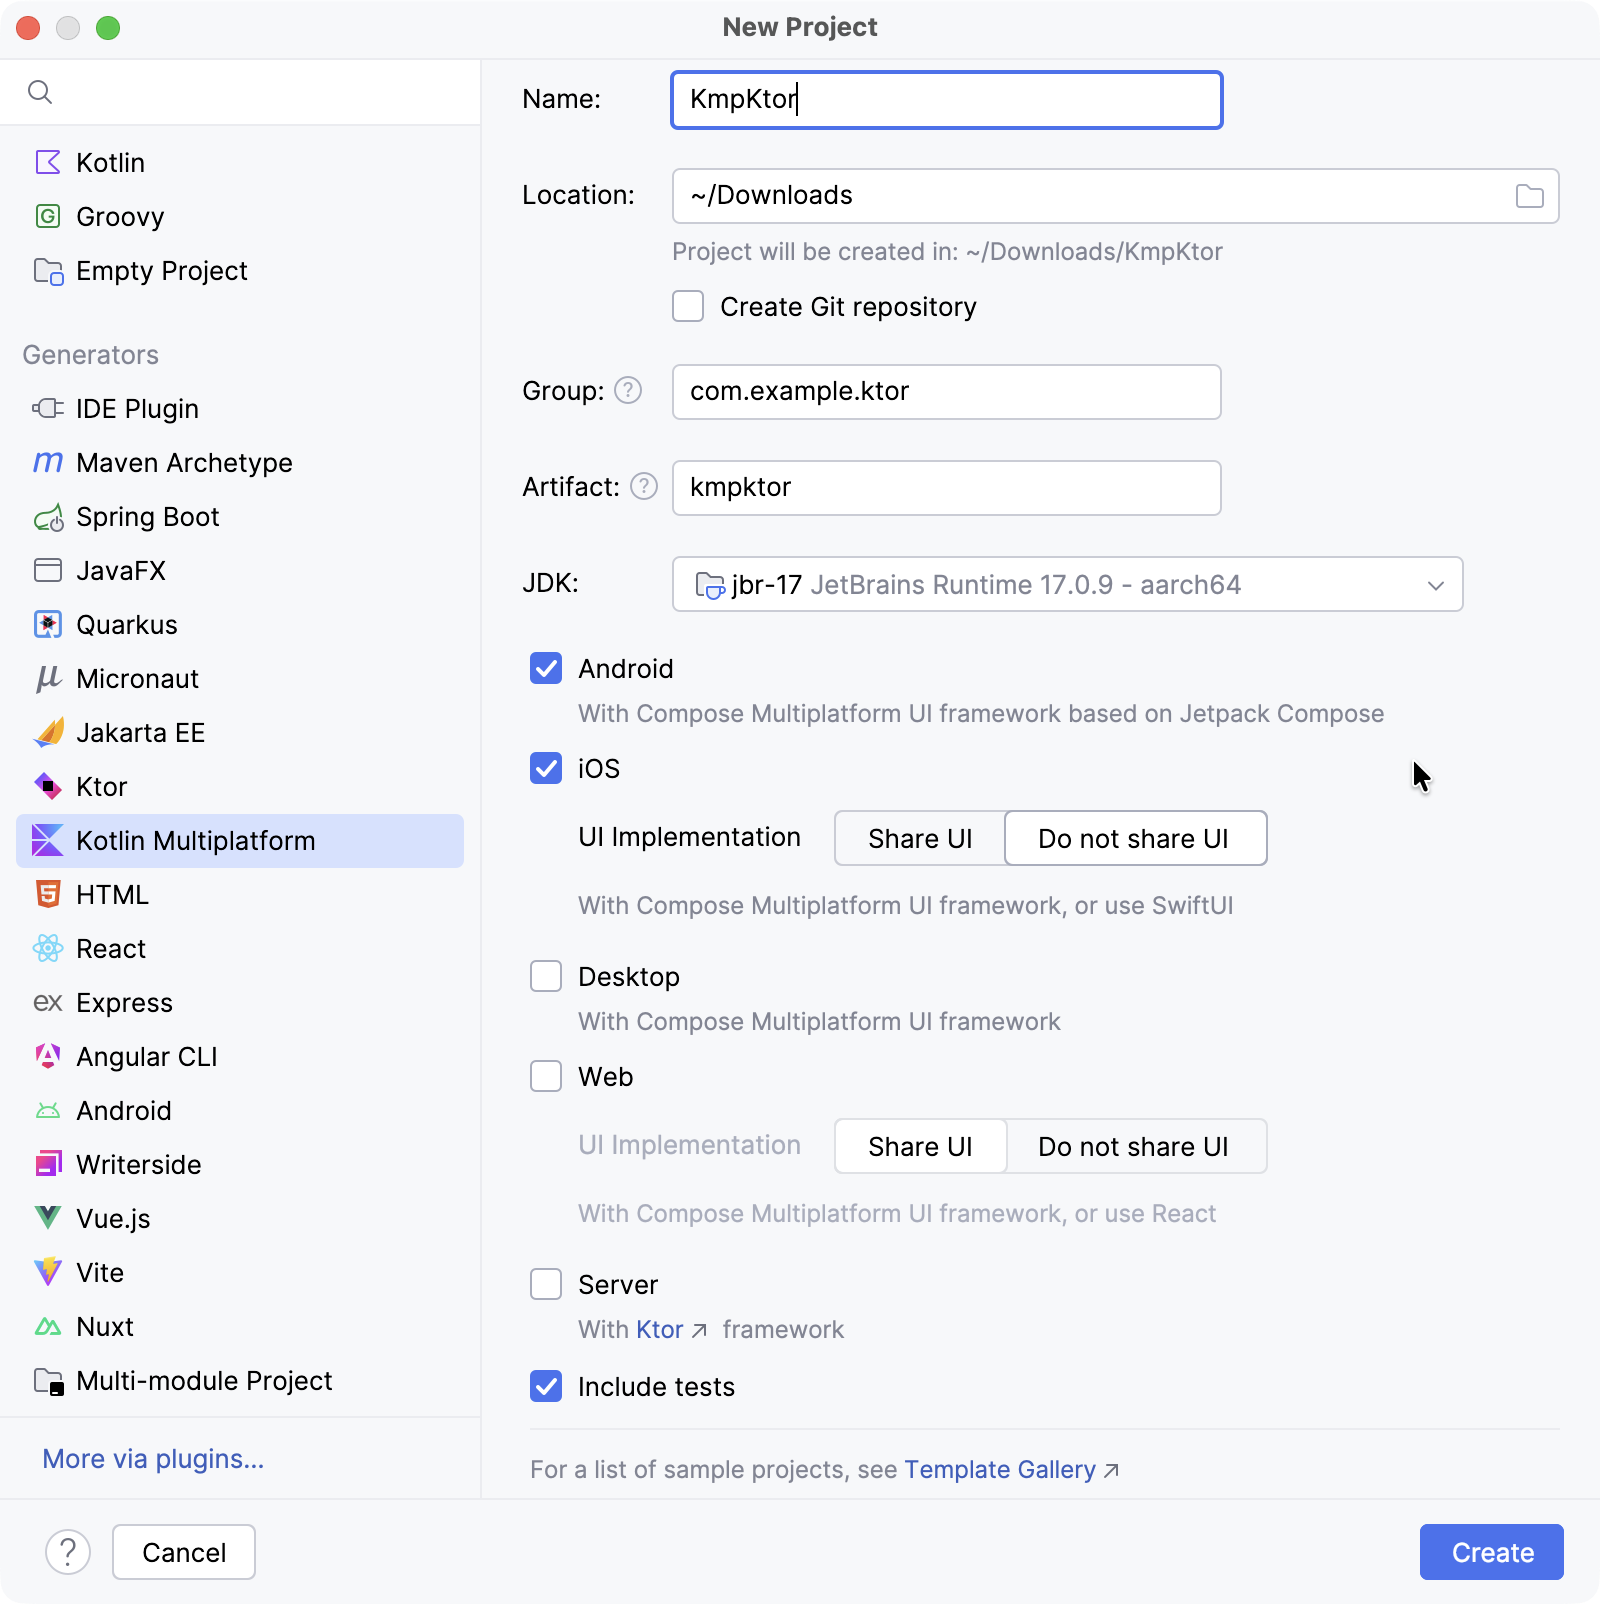
- AndroidとiOSターゲットを選択します。
- iOSの場合、UIをネイティブに保つために、Do not share UIオプションを選択します。
- Createボタンをクリックし、IDEがプロジェクトを生成してインポートするのを待ちます。
ビルドスクリプトを構成する
Ktorの依存関係を追加する
プロジェクトでKtor HTTPクライアントを使用するには、少なくとも2つの依存関係、つまりクライアント依存関係とエンジン依存関係を追加する必要があります。
- gradle/libs.versions.tomlファイルを開き、Ktorのバージョンを追加します。kotlin
[versions] ktor = "3.3.2" 同じgradle/libs.versions.tomlファイルで、Ktorクライアントとエンジンライブラリを定義します。
kotlin[libraries] ktor-client-core = { module = "io.ktor:ktor-client-core", version.ref = "ktor" } ktor-client-okhttp = { module = "io.ktor:ktor-client-okhttp", version.ref = "ktor" } ktor-client-darwin = { module = "io.ktor:ktor-client-darwin", version.ref = "ktor" }- shared/build.gradle.ktsファイルを開き、以下の依存関係を追加します。kotlin
sourceSets { commonMain.dependencies { implementation(libs.ktor.client.core) } androidMain.dependencies { implementation(libs.ktor.client.okhttp) } iosMain.dependencies { implementation(libs.ktor.client.darwin) } }ktor-client-coreをcommonMainソースセットに追加して、共有コードでKtorクライアント機能を有効にします。androidMainソースセットに、AndroidでOkHttpエンジンを使用するためのktor-client-okhttp依存関係を含めます。代替として、他の利用可能なAndroid/JVMエンジンから選択することもできます。iosMainソースセットに、iOSでDarwinエンジンを使用するためのktor-client-darwin依存関係を追加します。
コルーチンを追加する
Androidコードでコルーチンを使用するには、kotlinx.coroutinesをプロジェクトに追加する必要があります。
- gradle/libs.versions.tomlファイルを開き、コルーチンのバージョンとライブラリを指定します。kotlin
[versions] kotlinx-coroutines = "1.10.2" [libraries] kotlinx-coroutines-core = { module = "org.jetbrains.kotlinx:kotlinx-coroutines-core", version.ref = "kotlinx-coroutines" } kotlinx-coroutines-android = { module = "org.jetbrains.kotlinx:kotlinx-coroutines-android", version.ref = "kotlinx-coroutines" } - shared/build.gradle.ktsファイルを開き、
kotlinx-coroutines-core依存関係をcommonMainソースセットに追加します。kotlinsourceSets { commonMain.dependencies { implementation(libs.ktor.client.core) implementation(libs.kotlinx.coroutines.core) } } 次に、composeApp/build.gradle.ktsファイルを開き、
kotlinx-coroutines-android依存関係をandroidMainソースセットに追加します。kotlinsourceSets { androidMain.dependencies { // ... implementation(libs.kotlinx.coroutines.android) } }追加した依存関係をインストールするために、Build | Sync Project with Gradle Filesを選択します。
アプリケーションを更新する
共有コード
AndroidとiOS間で共有されるコードを更新するには、shared/src/commonMain/kotlin/com/example/ktor/kmpktor/Greeting.ktファイルを開き、Greetingクラスに以下のコードを追加します。
package com.example.ktor.kmpktor

import io.ktor.client.HttpClient
import io.ktor.client.request.get
import io.ktor.client.statement.bodyAsText

class Greeting {
    private val client = HttpClient()

    suspend fun greet(): String {
        val response = client.get("https://ktor.io/docs/")
        return response.bodyAsText()
    }
}Androidコード
composeApp/src/androidMain/kotlin/com/example/ktor/kmpktor/App.ktファイルを開き、コードを次のように更新します。package com.example.ktor.kmpktor
import androidx.compose.foundation.background
import androidx.compose.foundation.layout.Column
import androidx.compose.foundation.layout.fillMaxSize
import androidx.compose.foundation.layout.safeContentPadding
import androidx.compose.material3.MaterialTheme
import androidx.compose.material3.Text
import androidx.compose.runtime.*
import androidx.compose.ui.Alignment
import androidx.compose.ui.Modifier
import org.jetbrains.compose.ui.tooling.preview.Preview
@Composable
@Preview
fun App() {
MaterialTheme {
Column(
modifier = Modifier
.background(MaterialTheme.colorScheme.primaryContainer)
.safeContentPadding()
.fillMaxSize(),
horizontalAlignment = Alignment.CenterHorizontally,
) {
var text by remember { mutableStateOf("Loading") }
LaunchedEffect(true) {
text = try {
Greeting().greet()
} catch (e: Exception) {
e.message ?: "error"
}
}
GreetingView(text)
}
}
}
@Composable
fun GreetingView(text: String) {
Text(text = text)
}
@Preview
@Composable
fun DefaultPreview() {
MaterialTheme {
GreetingView("Hello, Android!")
}
}LaunchedEffect()は、コンポーザブルのライフサイクルに関連付けられたコルーチンを起動します。このコルーチン内で、共有のgreet()関数が呼び出され、その結果がtextに割り当てられ、発生した例外はキャッチされて処理されます。
iOSコード
iosApp/iosApp/ContentView.swiftファイルを開き、コードを次のように更新します。import SwiftUI
import Shared
struct ContentView: View {
@StateObject private var viewModel = ViewModel()
var body: some View {
Text(viewModel.text)
}
}
extension ContentView {
@MainActor
class ViewModel: ObservableObject {
@Published var text = "Loading..."
init() {
Greeting().greet { greeting, error in
if let greeting = greeting {
self.text = greeting
} else {
self.text = error?.localizedDescription ?? "error"
}
}
}
}
}iOSでは、サスペンド関数greet()はコールバックを持つ関数として利用できます。
Androidでインターネットアクセスを有効にする
最後に行う必要があるのは、Androidアプリケーションのインターネットアクセスを有効にすることです。
composeApp/src/androidMain/AndroidManifest.xmlファイルを開き、<uses-permission>要素を使用して必要なパーミッションを有効にします。<manifest>
<uses-permission android:name="android.permission.INTERNET" />
<application>
...
</application>
</manifest>Androidでアプリケーションを実行する
IntelliJ IDEAで、実行構成のリストからcomposeAppを選択します。
構成リストの横にあるAndroid仮想デバイスを選択し、Runをクリックします。

リストにデバイスがない場合は、新しいAndroid仮想デバイスを作成します。
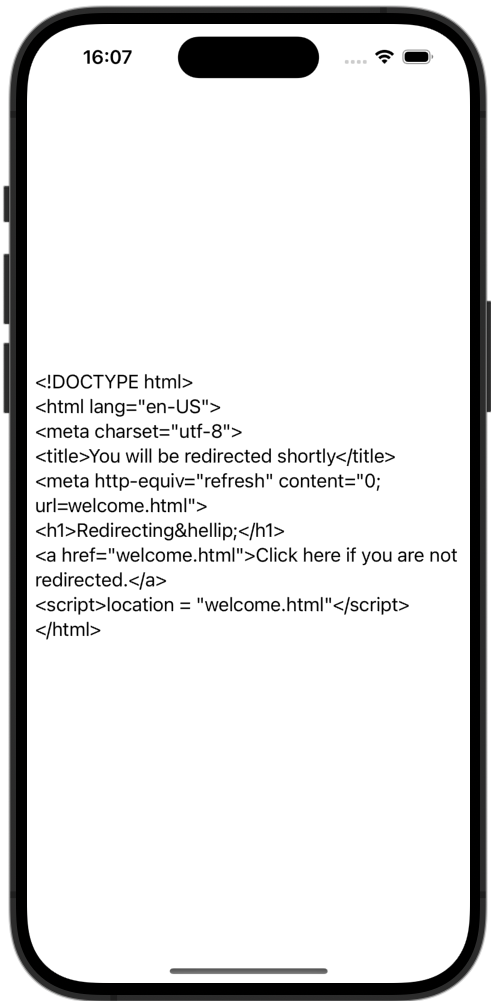
ロードされると、シミュレーターは受信したHTMLドキュメントをプレーンテキストで表示するはずです。
Androidエミュレーターがインターネットに接続できない場合は、コールドブートを試してください。Device Managerツールウィンドウで、停止しているデバイスの横にある⋮(3つの点)をクリックし、メニューからCold Bootを選択します。これは、接続の問題を引き起こす可能性のある破損したエミュレーターキャッシュをクリアするのに役立つことがよくあります。
iOSでアプリケーションを実行する
IntelliJ IDEAで、実行構成のリストからiosAppを選択します。
構成リストの横にあるiOSシミュレートされたデバイスを選択し、Runをクリックします。

リストに利用可能なiOS構成がない場合は、新しい実行構成を追加してください。
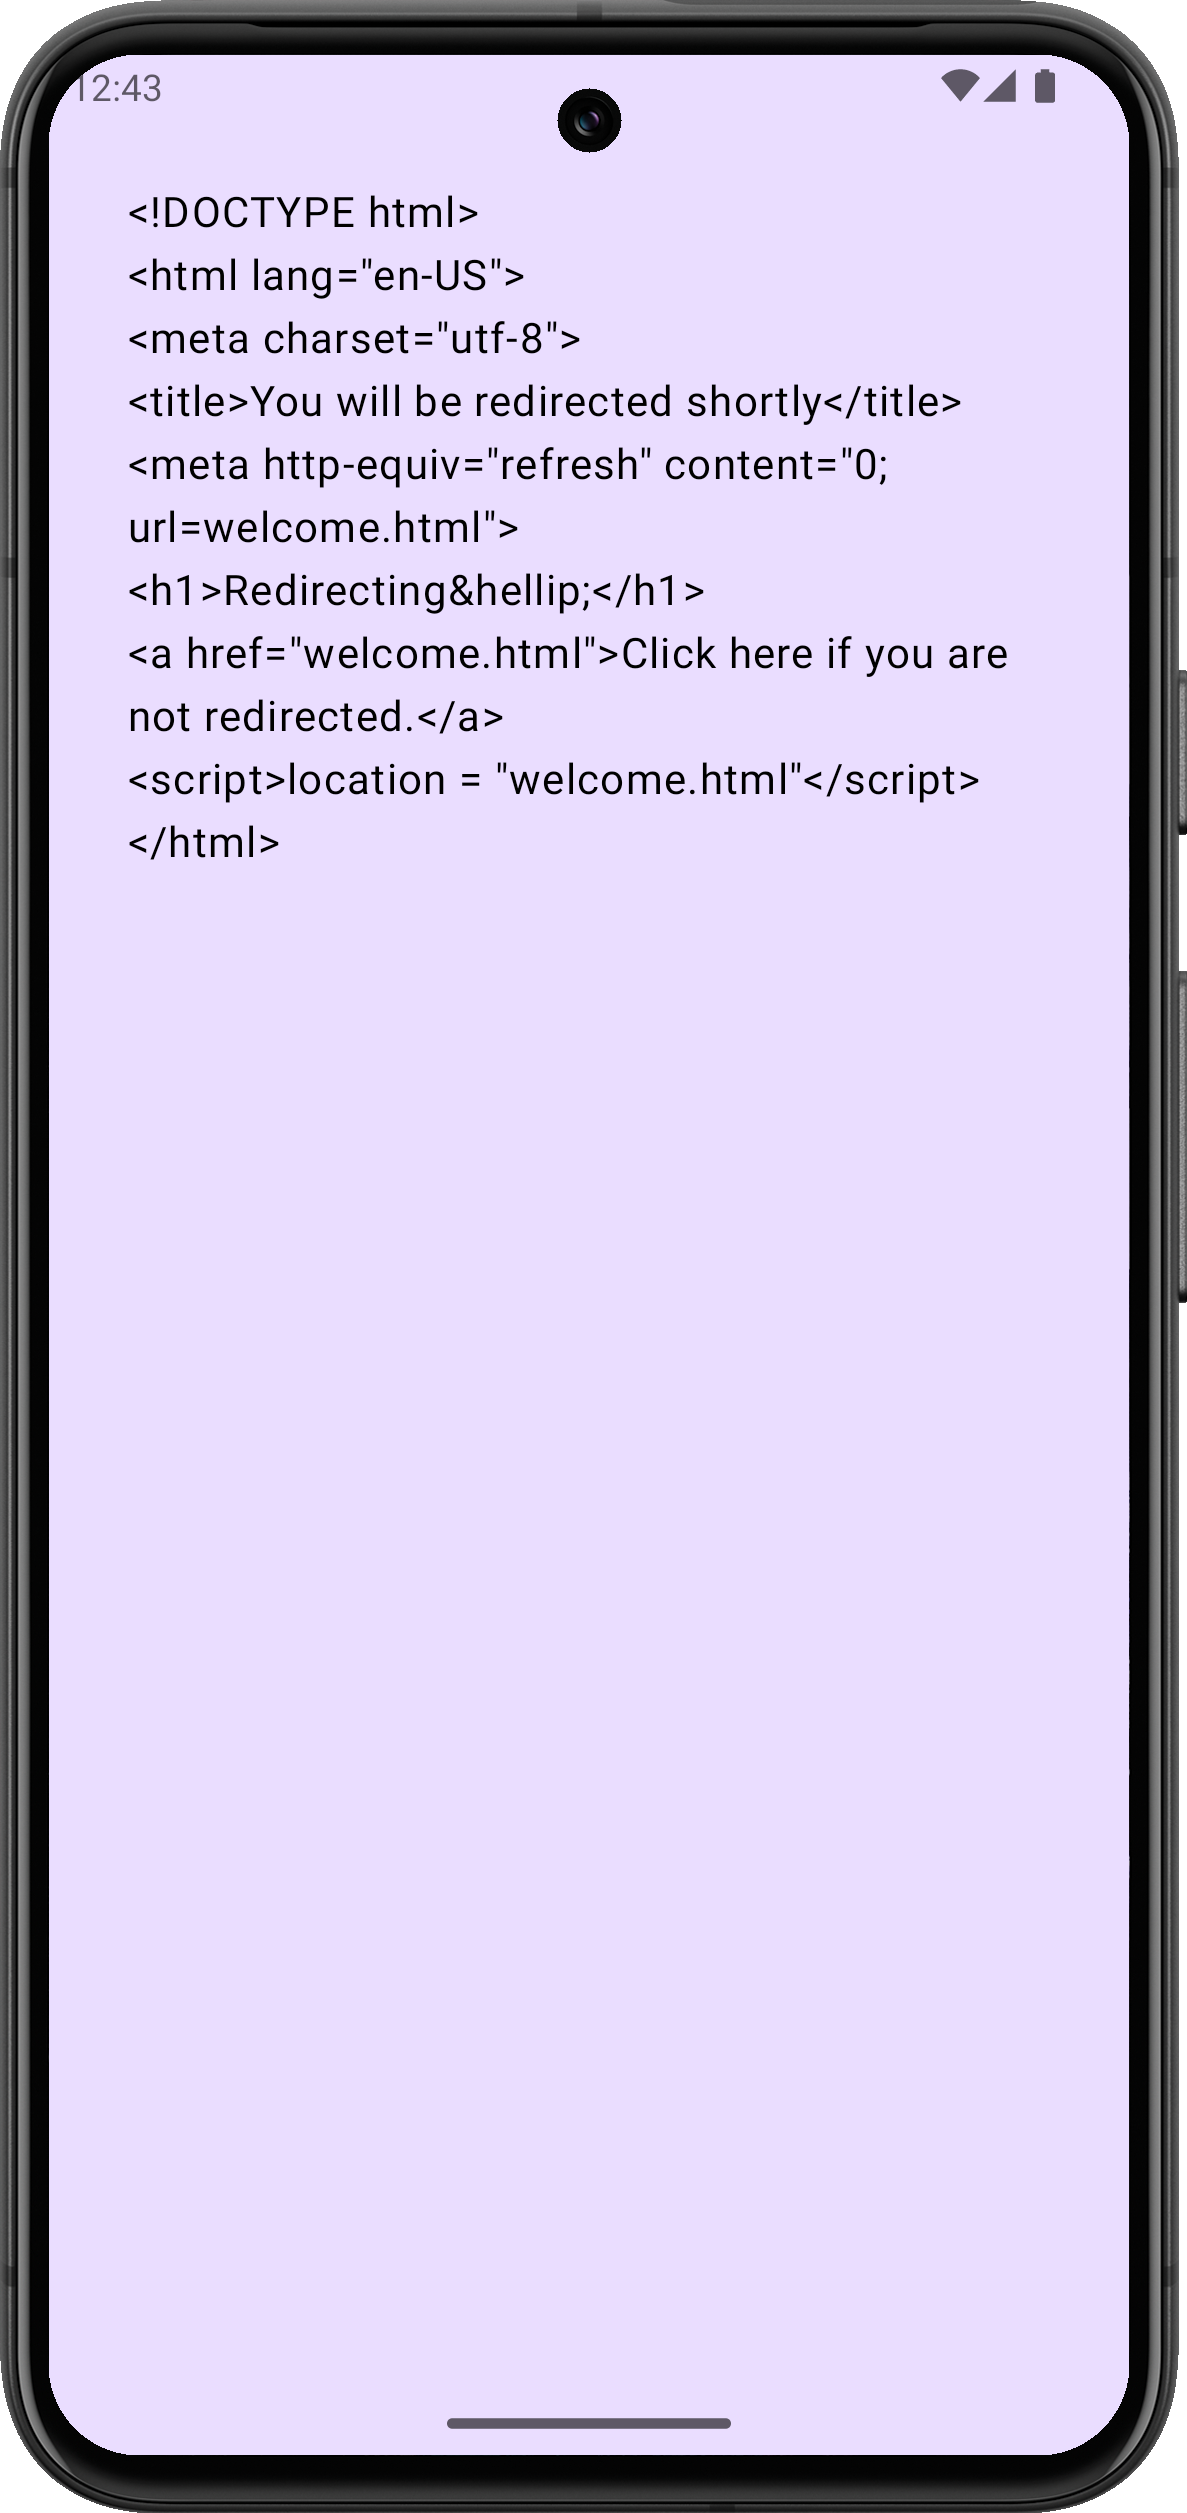
ロードされると、シミュレーターは受信したHTMLドキュメントをプレーンテキストで表示するはずです。