使用 Kotlin 建立 Spring Boot 專案
這是開始使用 Spring Boot 與 Kotlin 教學的第一部分:
![]() 使用 Kotlin 建立 Spring Boot 專案
使用 Kotlin 建立 Spring Boot 專案![]() 為 Spring Boot 專案新增資料類別
為 Spring Boot 專案新增資料類別![]() 為 Spring Boot 專案新增資料庫支援
為 Spring Boot 專案新增資料庫支援![]() 使用 Spring Data CrudRepository 進行資料庫存取
使用 Spring Data CrudRepository 進行資料庫存取
本教學的第一部分將展示如何在 IntelliJ IDEA 中透過專案產生器,使用 Gradle 建立 Spring Boot 專案。
本教學不強制要求使用 Gradle 作為建置系統。如果您使用 Maven,也可以遵循相同的步驟。
開始之前
下載並安裝最新版本的 IntelliJ IDEA 並使用 Ultimate 訂閱。
如果您沒有 IntelliJ IDEA Ultimate 訂閱或使用其他 IDE,可以使用 網頁版專案產生器 來產生 Spring Boot 專案。
建立 Spring Boot 專案
在 IntelliJ IDEA 中使用專案產生器建立新的 Kotlin Spring Boot 專案:
在 IntelliJ IDEA 中,選取 File | New | Project。
在左側面板的 Generators 區段中選取 Spring Boot。
在 New Project 視窗中指定以下欄位與選項:
Name: demo
Language: Kotlin
Type: Gradle - Kotlin
此選項指定了建置系統與 DSL。
Package name: com.example.demo
JDK: Java JDK
本教學使用 Amazon Corretto version 23。 如果您尚未安裝 JDK,可以從下拉式清單中下載。
Java: 17
如果您尚未安裝 Java 17,可以從 JDK 下拉式清單中下載。
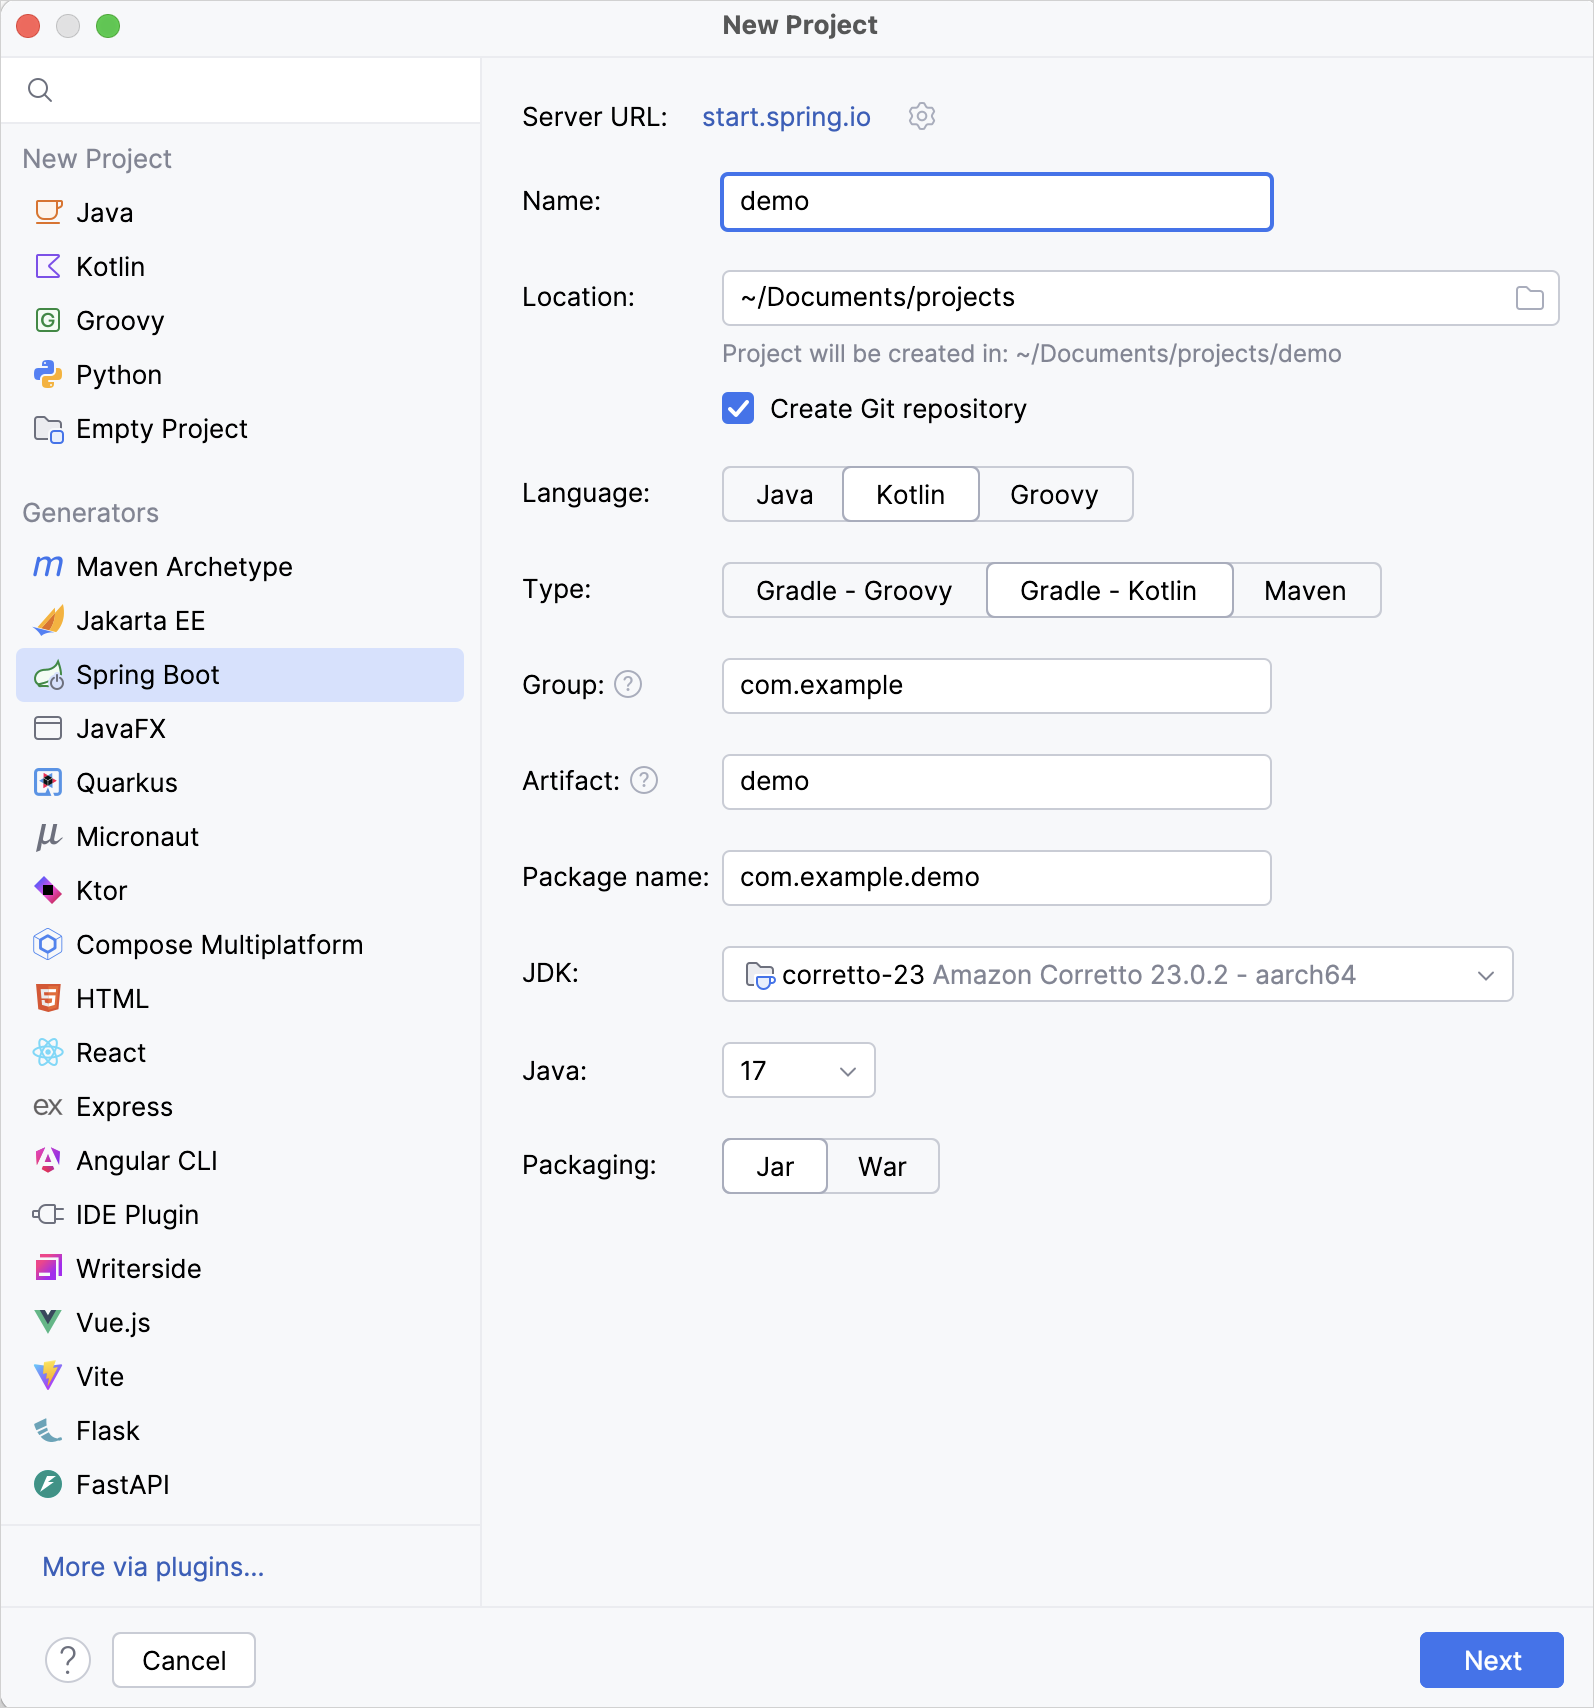
確認您已填寫所有欄位後,點擊 Next。
選取本教學所需的以下相依性:
- Web | Spring Web
- SQL | Spring Data JDBC
- SQL | H2 Database
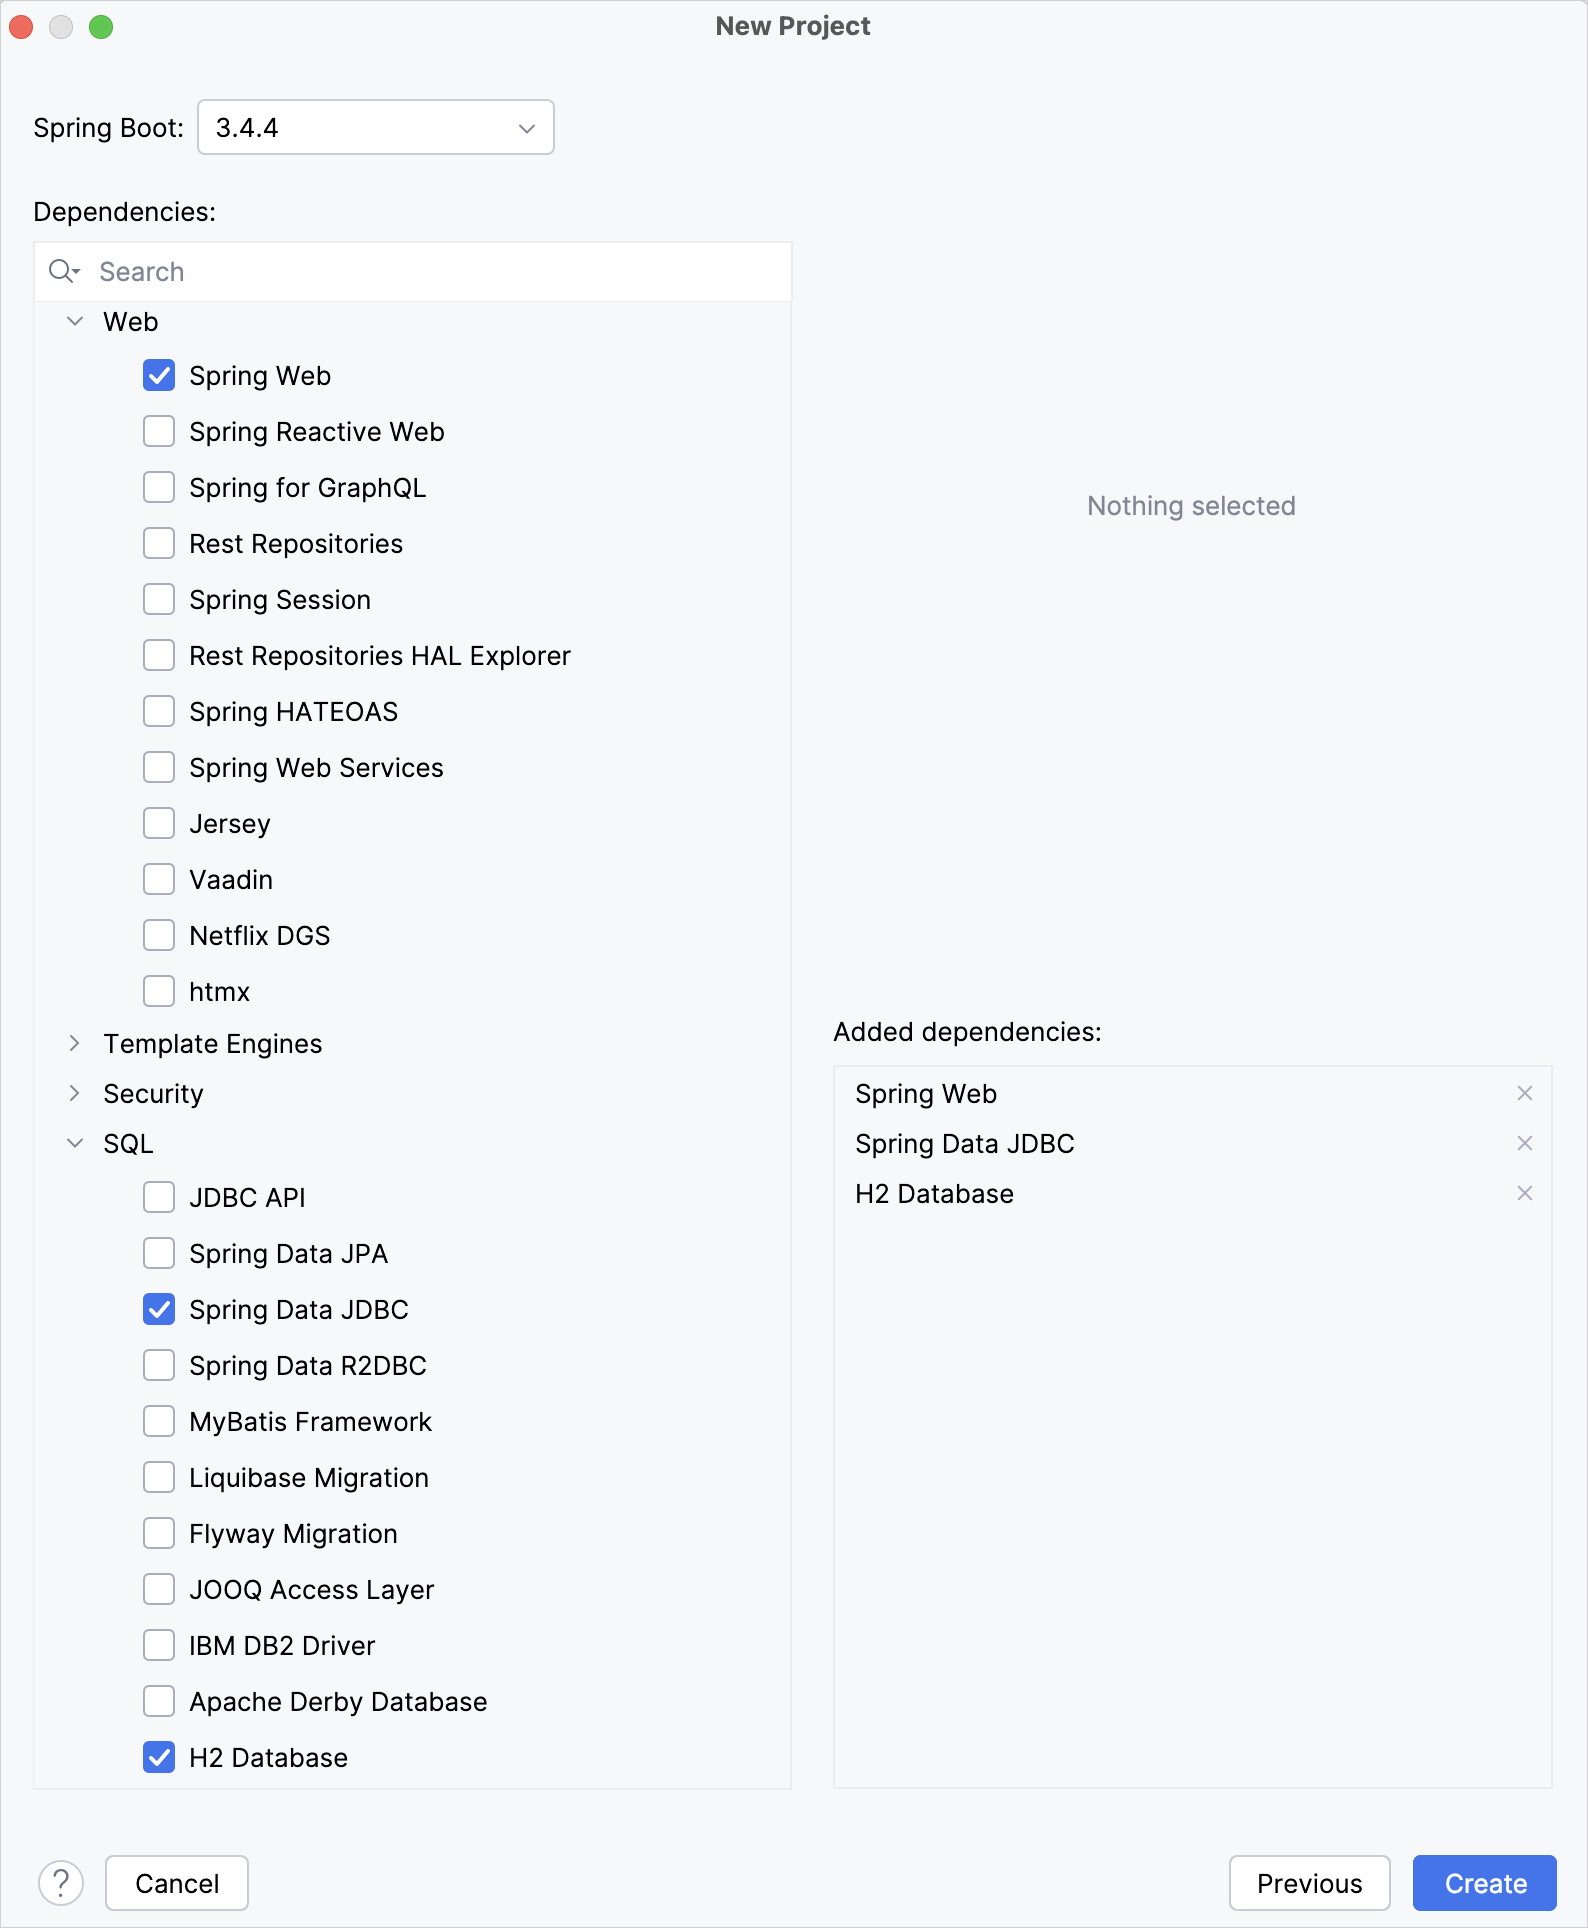
點擊 Create 以產生並設定專案。
IDE 將產生並開啟一個新專案。下載與匯入專案相依性可能需要一些時間。
完成後,您可以在 專案檢視 中觀察到以下結構:
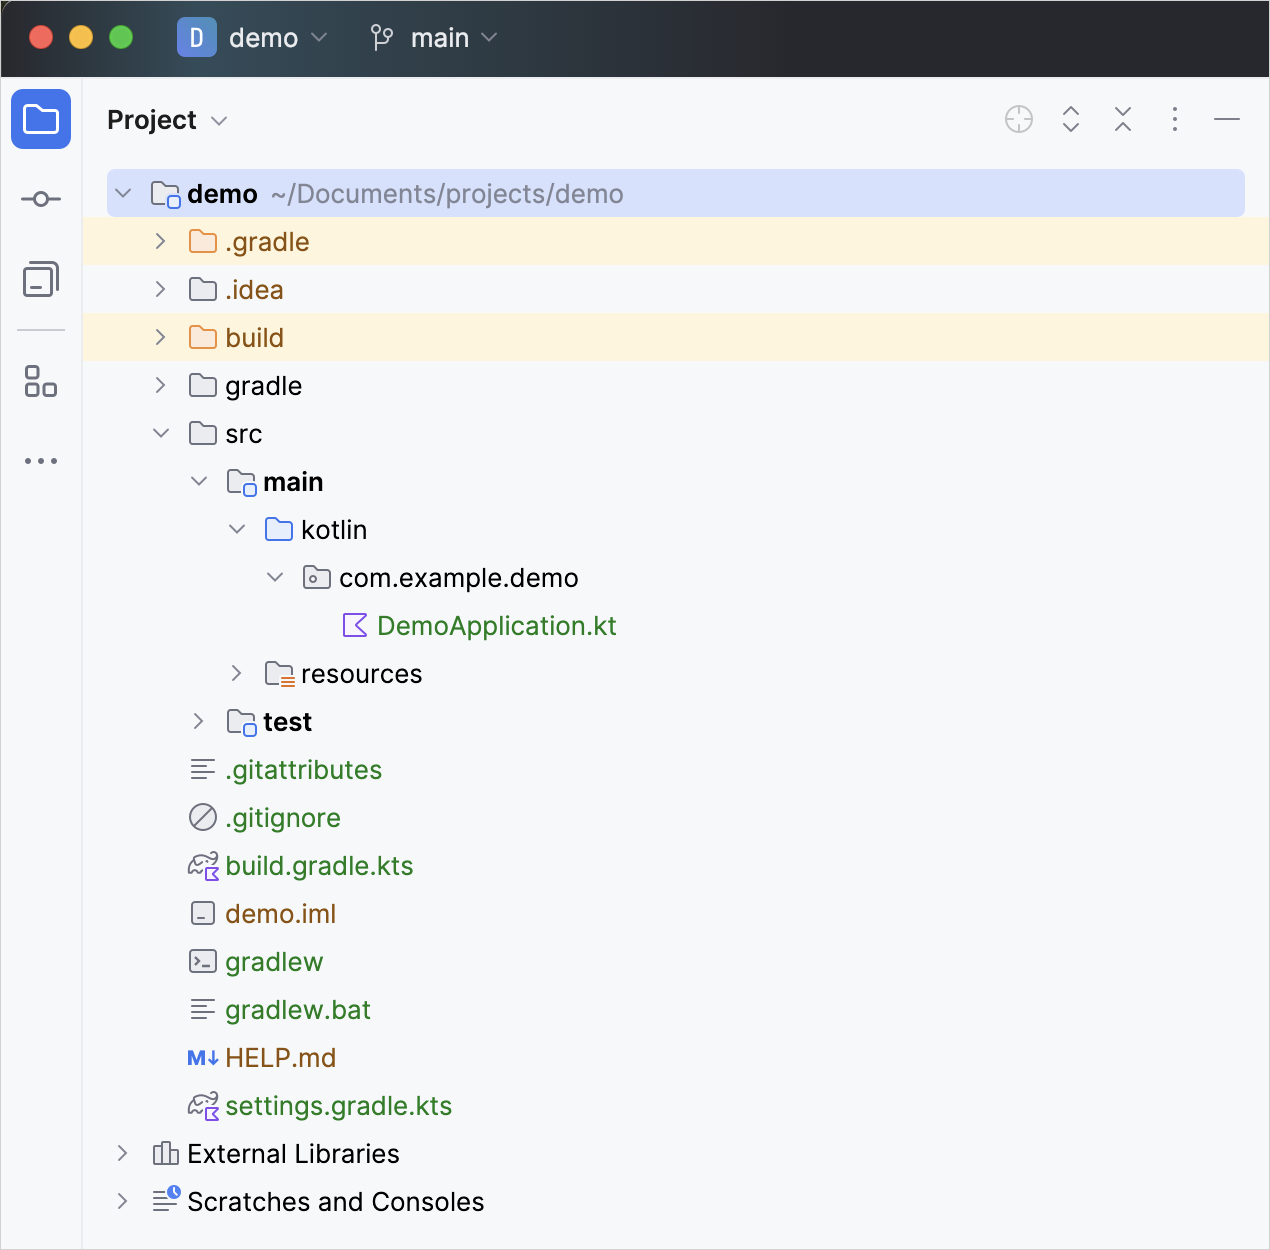
產生的 Gradle 專案符合 Maven 的標準目錄配置:
- 在
main/kotlin資料夾下有屬於該應用程式的套件與類別。 - 應用程式的進入點是
DemoApplication.kt檔案中的main()方法。
- 在
探索專案 Gradle 組建檔案
開啟 build.gradle.kts 檔案:這是 Gradle Kotlin 組建指令碼,其中包含應用程式所需的相依性清單。
此 Gradle 檔案對於 Spring Boot 來說是標準格式,但也包含了必要的 Kotlin 相依性,包括 kotlin-spring Gradle 外掛程式 – kotlin("plugin.spring")。
以下是完整指令碼,並附帶各部分與相依性的說明:
// build.gradle.kts
plugins {
    kotlin("jvm") version "2.2.21" // 要使用的 Kotlin 版本
    kotlin("plugin.spring") version "2.2.21" // Kotlin Spring 外掛程式
    id("org.springframework.boot") version "4.0.2"
    id("io.spring.dependency-management") version "1.1.7"
}

group = "com.example"
version = "0.0.1-SNAPSHOT"

java {
    toolchain {
        languageVersion = JavaLanguageVersion.of(17)
    }
}

repositories {
    mavenCentral()
}

dependencies {
    implementation("org.springframework.boot:spring-boot-h2console")
    implementation("org.springframework.boot:spring-boot-starter-data-jdbc")
    implementation("org.springframework.boot:spring-boot-starter-webmvc")
    implementation("org.jetbrains.kotlin:kotlin-reflect") // Kotlin 反射程式庫,與 Spring 搭配運作時所需
    implementation("tools.jackson.module:jackson-module-kotlin") // 用於處理 JSON 的 Jackson Kotlin 擴充套件
    runtimeOnly("com.h2database:h2")
    testImplementation("org.springframework.boot:spring-boot-starter-data-jdbc-test")
    testImplementation("org.springframework.boot:spring-boot-starter-webmvc-test")
    testImplementation("org.jetbrains.kotlin:kotlin-test-junit5")
    testRuntimeOnly("org.junit.platform:junit-platform-launcher")
}

kotlin {
    compilerOptions {
        freeCompilerArgs.addAll("-Xjsr305=strict", "-Xannotation-default-target=param-property") // `-Xjsr305=strict` 啟用 JSR-305 註解的嚴格模式
    }
}

tasks.withType<Test> {
    useJUnitPlatform()
}
如您所見,Gradle 組建檔案中新增了幾個與 Kotlin 相關的構件:
在
plugins區塊中,有兩個 Kotlin 構件:kotlin("jvm")外掛程式定義了專案中要使用的 Kotlin 版本。- Kotlin Spring 編譯器外掛程式
kotlin("plugin.spring")會為 Kotlin 類別新增open修飾詞,使其與 Spring Framework 特性相容。
在
dependencies區塊中,列出了幾個與 Kotlin 相關的模組:tools.jackson.module:jackson-module-kotlin模組新增了對 Kotlin 類別與資料類別序列化與反序列化的支援。org.jetbrains.kotlin:kotlin-reflect是 Kotlin 反射程式庫,可完整支援 反射特性。
在相依性區段之後,您可以看到
kotlin外掛程式組態區塊。 您可以在此處向編譯器新增額外引數,以啟用或停用各種語言特性。
探索產生的 Spring Boot 應用程式
開啟 DemoApplication.kt 檔案:
// DemoApplication.kt
package com.example.demo

import org.springframework.boot.autoconfigure.SpringBootApplication
import org.springframework.boot.runApplication

@SpringBootApplication
class DemoApplication

fun main(args: Array<String>) {
    runApplication<DemoApplication>(*args)
}
宣告類別 – class DemoApplication
在套件宣告與 import 陳述式之後,您可以看到第一個類別宣告 class DemoApplication。
在 Kotlin 中,如果類別不包含任何成員(屬性或函式),您可以直接省略類別主體 ({})。
@SpringBootApplication 註解
@SpringBootApplication 註解 是 Spring Boot 應用程式中的一個便利註解。 它啟用了 Spring Boot 的 自動配置、組件掃描,並能夠在「應用程式類別」上定義額外組態。
可變參數 – args: Array<String>
如果您查看 runApplication() 函式的宣告,會發現該函式的參數標有 vararg 修飾詞:vararg args: String。 這意味著您可以向該函式傳遞可變數量的字串引數。
展開運算子 – (*args)
args 是 main() 函式的參數,宣告為字串陣列。 由於這是一個字串陣列,而您希望將其內容傳遞給函式,請使用展開運算子(在陣列前加上星號 *)。
建立控制器
應用程式已準備好執行,但讓我們先更新其邏輯。
在 Spring 應用程式中,控制器用於處理 Web 請求。 在同一個套件中,於 DemoApplication.kt 檔案旁邊建立 MessageController.kt 檔案,並包含如下的 MessageController 類別:
// MessageController.kt
package com.example.demo

import org.springframework.web.bind.annotation.GetMapping
import org.springframework.web.bind.annotation.RequestParam
import org.springframework.web.bind.annotation.RestController

@RestController
class MessageController {
    @GetMapping("/")
    fun index(@RequestParam("name") name: String) = "Hello, $name!"
}
@RestController 註解
您需要告訴 Spring,MessageController 是一個 REST 控制器,因此應該用 @RestController 註解標記它。
此註解意味著該類別將被組件掃描偵測到,因為它與我們的 DemoApplication 類別位於同一個套件中。
@GetMapping 註解
@GetMapping 標記 REST 控制器中實作對應於 HTTP GET 調用端點的函式:
@RequestParam 註解
函式參數 name 標有 @RequestParam 註解。此註解表示方法參數應繫結至 Web 請求參數。
因此,如果您存取應用程式的根目錄並提供名為 "name" 的請求參數,例如 /?name=<your-value>,該參數值將作為引數用於調用 index() 函式。
單一運算式函式 – index()
由於 index() 函式僅包含一個陳述式,您可以將其宣告為 單一運算式函式。
這意味著可以省略花括號,並在等號 = 後指定主體。
函式傳回型別的型別推論
index() 函式沒有明確宣告傳回型別。相反,編譯器會透過查看等號 = 右側陳述式的結果來推論傳回型別。
Hello, $name! 運算式的型別是 String,因此函式的傳回型別也是 String。
字串範本 – $name
執行應用程式
Spring 應用程式現在已準備好執行:
在
DemoApplication.kt檔案中,點擊main()方法旁邊邊欄中的綠色 Run 圖示: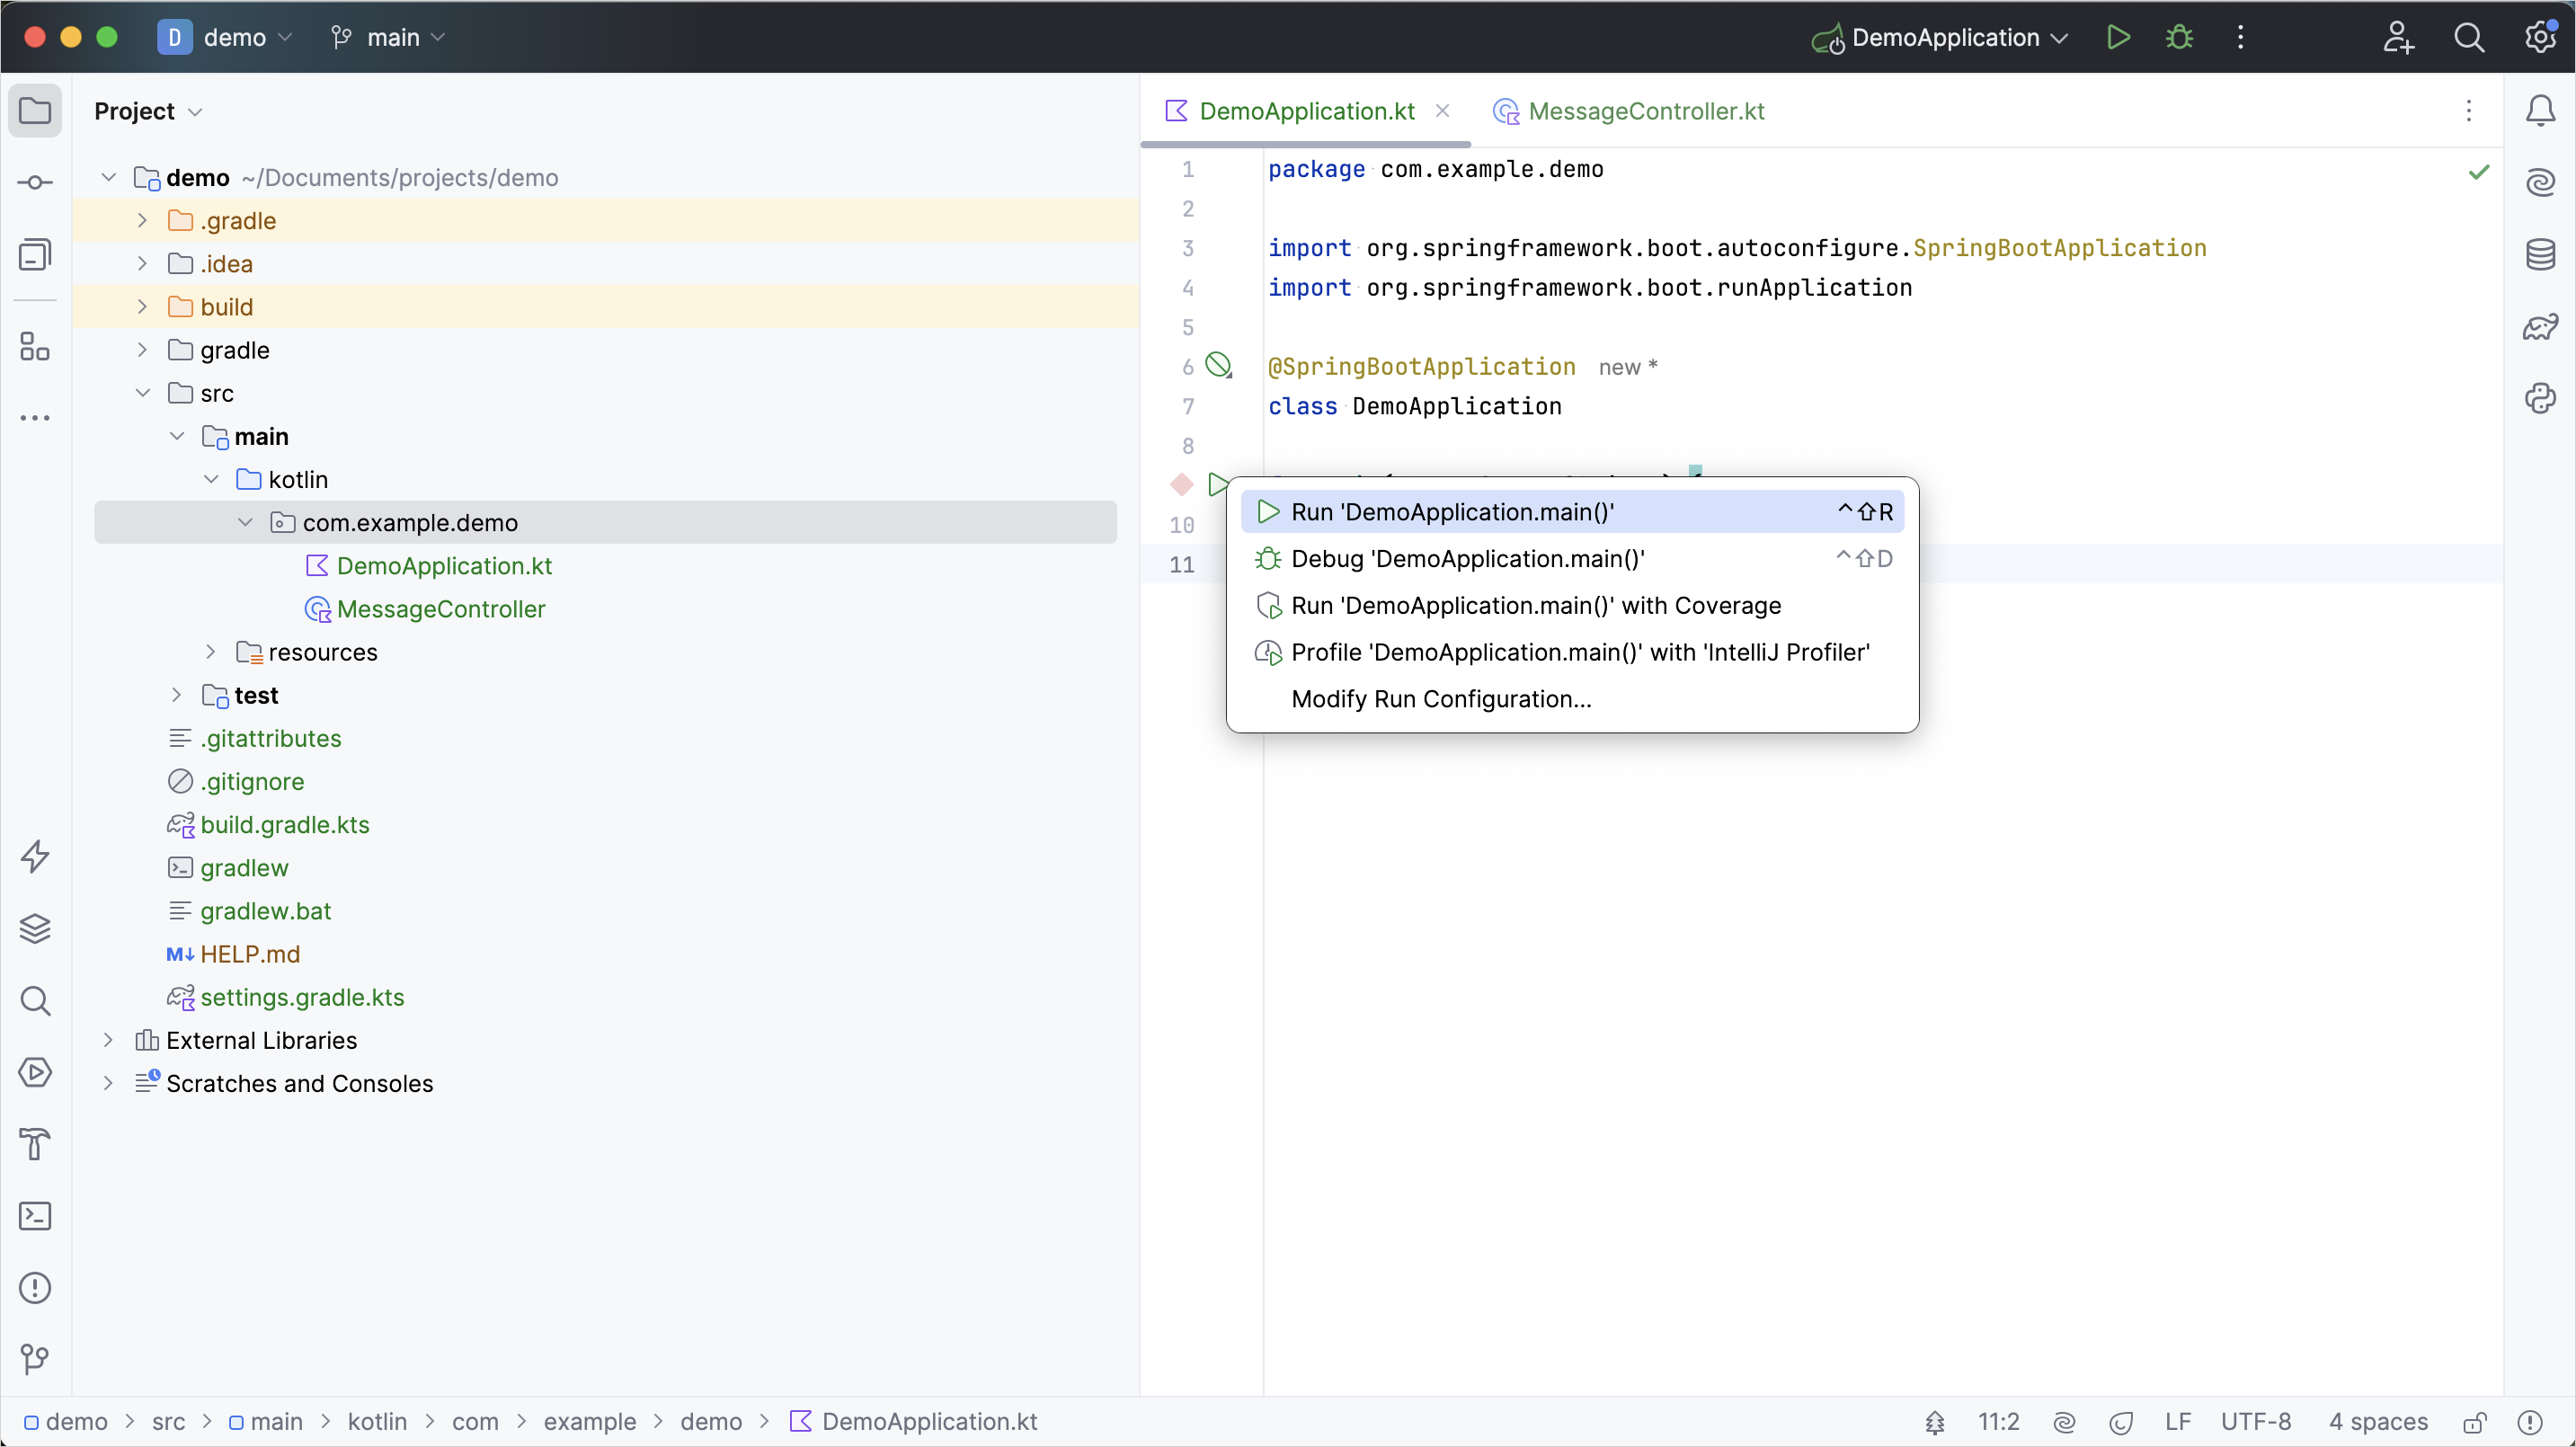
您也可以在終端機中執行
./gradlew bootRun指令。這將在您的電腦上啟動本機伺服器。
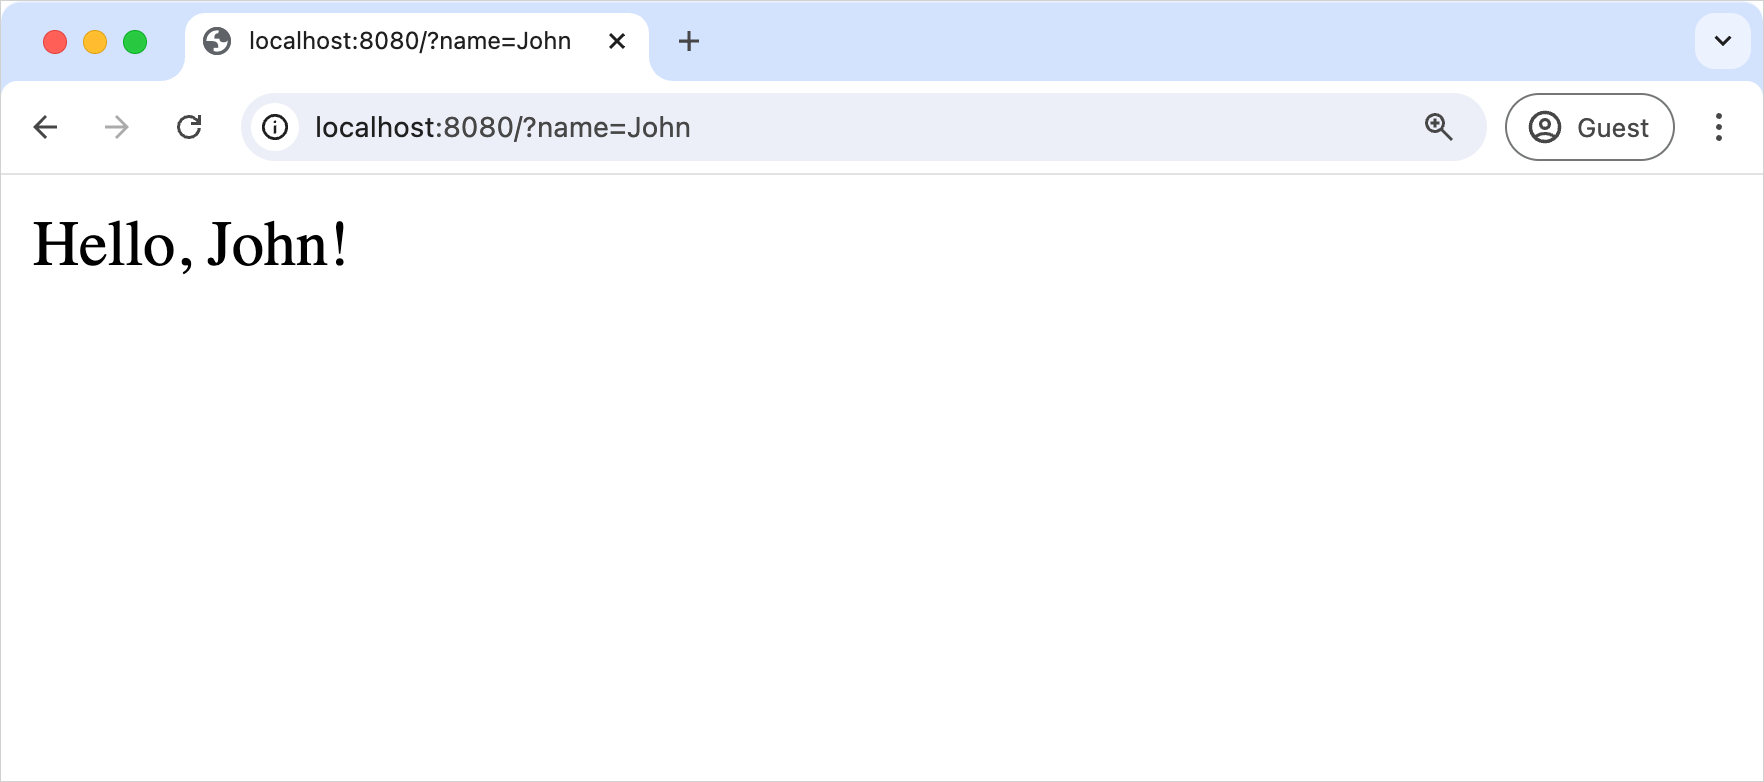
應用程式啟動後,開啟以下 URL:
texthttp://localhost:8080?name=John您應該會看到「Hello, John!」作為回應印出:
下一步
在本教學的下一部分中,您將學習 Kotlin 資料類別以及如何在應用程式中使用它們。